Enemy Appearances

Purpose

This article explains how to change what the enemies look like, by setting a minecraft-style skin on them.  (It does not cover how to create skins or where to obtain ones that are appropriate for our games.)

Applicability

This article is applicable to anyone wanting to change the appearance of enemies using the D5.1+ codebase.

Video

https://youtu.be/82rM4gRlkLE

Written Instructions

What Do I Need To Reskin?

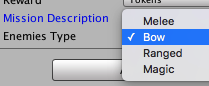
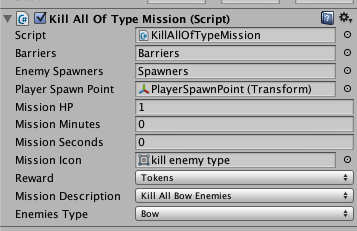
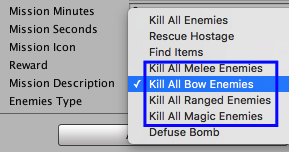
The texture that is applied to an enemy is called a ‘skin’.  There are four classes of enemies (Melee, Bow, Ranged, Magic) in the D5.1 project, and they come in at five different power levels.  You need to supply 20 skins (4 classes * 5 skins each) for your enemies.  They don’t necessarily need to be unique; use your judgement.

If your game doesn’t use a class of enemies (ex. there are no “Magic” enemies in my science fiction game), then reuse textures from the other enemy types for that class.  [That way, if a Dynamic Variable is ever turned on that puts one of the unexpected enemies in your game, they’ll still look like they fit in.]

Skin Dimensions

The D5.1 codebase uses standard Minecraft skins, in the Minecraft version 1.7 and previous format.  These skins are 64 pixels wide and 32 pixels tall.  [If you find a Minecraft-1.8-style skin, which is 64×64 pixels, crop off the bottom half to make it 32×32 pixels. If you don’t have a tool you like (say, Photoshop), you might try FireAlpaca.]

Importing Skins

I suggest created a folder for your skins – say Assets/Textures/Skins/Your Game Name –and putting your texture images there.

The skins need to be imported with very specific settings, as follows:
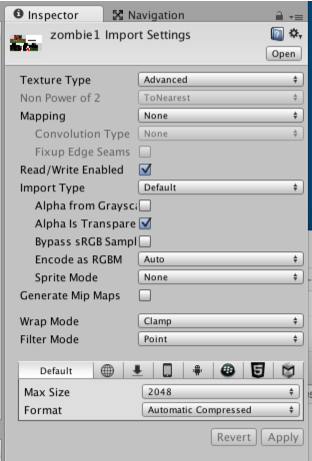
Enemy Skin Import Settings

Why these settings?

  • Texture Type = Advanced ⇒ so we can turn on Read/Write Enabled.
  • Read/Write Enabled = On ⇒ needed so that dead enemies turn into a pile of blocks using colours from the image
  • Filter Mode = Point ⇒ makes the texture show up sharp and clear (instead of blurry).
  • Generate Mip-Maps = Off ⇒ Mip maps are smaller textures used when an object is far away. This is already a tiny texture.
  • Alpha = Transparency  if the skin image has transparency in it, it’ll be transparent on the enemy.

Using The Skins

In the folder Assets/Resources/NPCFiles/NPCMaterials/BlockMaterials, you will find the following material files:

  • Magic1, Magic2, Magic3, Magic4, Magic5
  • Melee1, Melee2, … Melee5
  • Ranged1, Ranged2, … Ranged5
  • Bow1, Bow2, … Bow5

(There are also several other files there, and other materials.  I don’t think they are used and hope to remove them in the future.)

These materials are applied to your enemies.  The “Melee1” material is applied to a Tier 1 Melee enemy, and the “Bow4” material is applied to a Tear 4 Bow enemy.

Changing A Skin

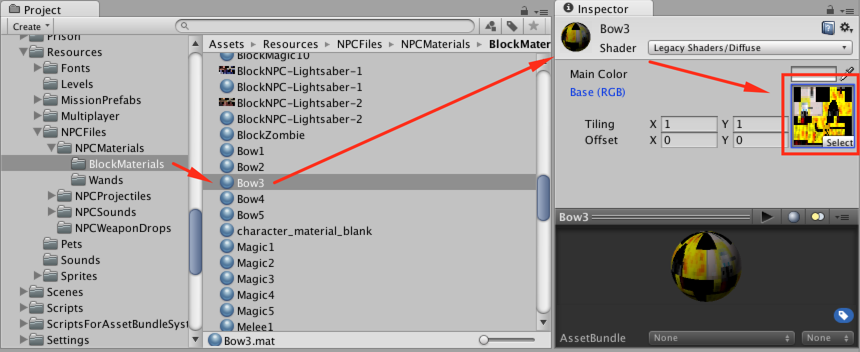
With the material displayed in the inspector, click on the ‘select’ button, and choose whichever skin you want used for that type of enemy.


Rescue Mission

Purpose

To explain how to create a mission in which the player has to get to a specific point to “rescue” a hostage or to defuse a bomb.

Applicability

This article is applicable to Game Designers using the D5.1+ code. We expect all types of missions in all games.

Video:


Notes:

– Don’t use copyrighted items for the bombs or for the hostage. The bomb used as an example in the video is copyrighted, so use a different one that fits with the game’s theme.
– For placing a person instead of a bomb, use the prefab named “rescue person”, located in the Assets/_AAPrefabs folder

Find Items Mission

Purpose

Explains how to create a ‘find items’ mission.

Applicability

This article is applicable to Game Designers using the D5.1+ code. We expect some of each type of mission in all games.

Video

https://youtu.be/9qZuJ2nTkhU


Kill All Of Type Mission

Purpose

Explains things you need to know specific to the ‘Kill All Enemies of Type’ mission.

Applicability

This article is applicable to Game Designers using the D5.1+ code.  We expect every game to have some ‘kill all enemies of type’ missions.


Written Explanation

In a “Kill All of Type” mission, the player has to kill all the enemies of a specific type.

The types are:

Kill All Mission Targets– Melee (someone who fights hand-to-hand or with a sword)
– Bow (someone who uses a bow and arrow)
– Ranged (someone who fights using a gun)
– Magic (someone who fights using magic)

I hope it goes without saying that there should be multiple types of enemies in the level.  Regular enemies will show up in yellow on the radar, but the special, target enemies to kill will show up in red.

A completed ‘Kill All Of Type’ mission might look like this (although the time and HP goals need to be set).

Kill All Of Type Mission

In “Enemies Type”, you set the type of enemies to kill.  Be sure to choose a matching “Mission Description”.

Kill All Mission Types

Relocation Points

Purpose

To help save you tons of time in placing spawn points in your scenes.


Applicability

This article is applicable to Game Designers using the D5.1+ code.  It is optional, but highly recommended.

Video

https://www.youtube.com/watch?v=hGcm0A74sBw


Mission System Basics

Purpose

This article explains the basics of creating missions.

Applicability

This article is applicable to Game Designers using the D5.1+ code.

Video

The video is uploading but it looks like it won’t be up for a couple of hours.  In the interim, look at the video on Dynamic Variables in Action, remember previous training you’ve had on the missions, and play with them to see if you can accomplish anything.


https://youtu.be/_OzqnxtXZgU

Notes

I recommend planning out the different sorts of missions you want to use and placing all four missions that will go in a scene at the same time.

Mission Icons are in Resources/Sprites/Missions.

Not Mentioned In Video

Players are rewarded for completing a mission quickly and with a certain amount of health.  You need to set the time it should take to complete the mission, and how much health they should end with to receive a checkmark.

Mission Health Setting

If you figure a player should need 45% of their health to be rewarded, set Mission HP to 45.

If you figure a mission should take 3 minutes 27 seconds to beat, set Mission Minutes to 3 and Mission Seconds to 27.


See Also

  • Baking The Nav Meshes
  • Using Relocation Points
  • Posts on specific missions

[To do — add links here.]


Using Navigation Meshes

Purpose

Shows how to ‘bake’ a navigation mesh (or ‘navmesh’ for short), why it is important, and how to make AIs follow paths.

Applicability

This step needs to be performed for every game scene by Game Designers building on the D5.1+ code.

Video

https://www.youtube.com/watch?v=oc1uxYiPoTA


Dynamic Variables In Action

Purpose

To give a brief idea of the magic that happens behind the scenes that makes dynamic variables work.

Applicability

This article is optional and applicable to Game Designers (and Developers) using the D5.1+ code.

Video

Video explanation, if possible


https://youtu.be/46mGanOHe9E