
Purpose
This post explains how to publish a game in iOS Store since the very beginning as well as how to update an existing game in the Store.
First requirements
To be able to follow along this tutorial, you need to have an iOS computer (either iMac or MacBook) with at least iOS version 10.13 High Sierra. Also you need yo have installed Xcode version 10.0 or higher. The version of Unity will vary depending on the project you are trying to update. For this tutorial I’ll use Unity 2018.1.6f1.
Unity configurations
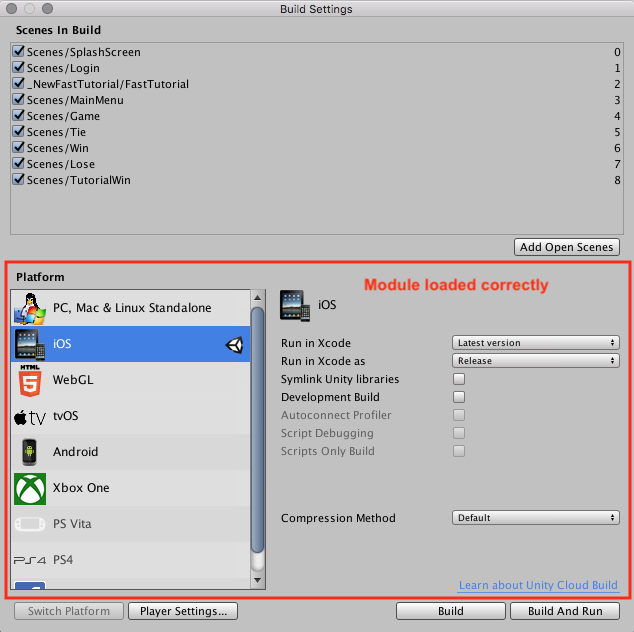
First of all, download the iOS module in Unity. To doing this you need to go to File > Build Settings (Shift + Command + B), then in the Platform section click in iOS. If you don’t see the module loaded click in Open Download Page and install the corresponding package. Once it’s done and you restarted Unity, you should see something like this (also make sure your default settings here are correct):
Then in the same window click Player settings. Now here comes the funny part, here is where you will change all the specific setting for iOS. The first 4 sections (Icon, Resolution and Presentation, Splash Image & Debugging and crash reporting) should be fine with the default settings, you should be able to create a functional build without moving these sections. And the last section (XR Settings) as well (unless you are messing with AR or VR, which is awesome) should be left with the default settings. The section that concern to us is the Other Settings:
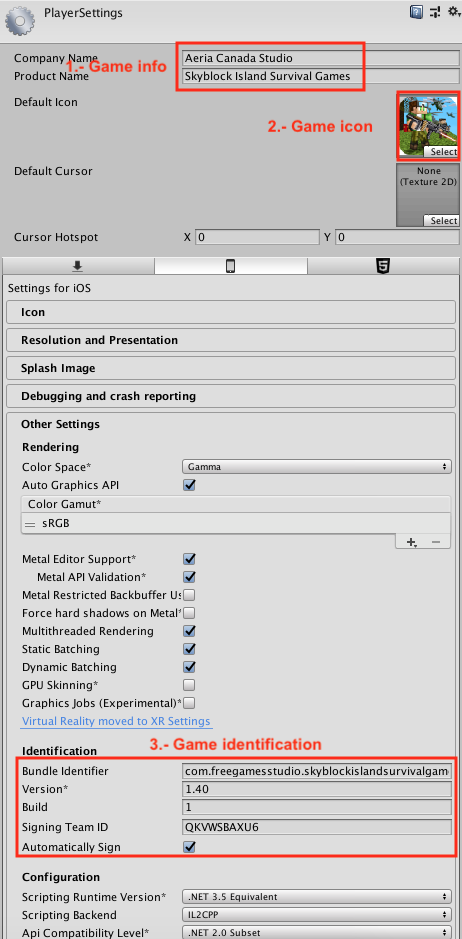
- 1.- Game info: here you will edit the game information, such as the game and the company. Please note that the name typed here should be EXACTLY THE SAME as the name you will use in the App Store.
- 2.- Game icon: this icon must be in 1024×1024 resolution. All the other sizes for the iDevices are managed automatically in Xcode, so do not worry about that.
- 3.- Game identification: this is the main identification of your game. The Bundle Identifier works like in Android, it should be unique for every game. If you’re updating an existing game in the store, please use the same one that is registered in Apple (we’ll see where and how later, just keep in mind this field). The Version and the Build number work as the BVC does in Android, but with the difference that you can use any combination possible, e.g. you could have a version 1.0 with a build number 0, after that you could either bump up the build number to 1 and keep the version as 1.0 or you could change the version number to, let’s say, 1.1 and reset the build number to 0. Remember that if you upload a build with X version and build number to Apple (even if it failed in something), then you can’t upload again that same version+build number.
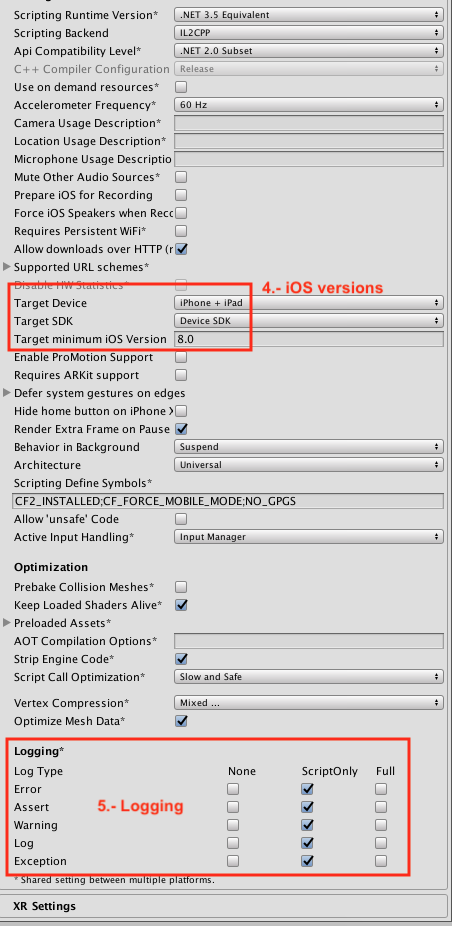
Then the Signing Team ID is the number of your team in Apple; you can find this ID under the Membership tab in Apple Developer Website. We’ll see in more detail how to access to this site later. - 4.- iOS versions: the Target Device is recommended to be iPhone + iPad but this could vary depending on your project specifications. The Target SDK should always be as Device SDK when you want a build for production and/or internal testing (or TestFlight), but you could change that to Simulator SDK if you want to run a test version in your simulator (we’ll see also how to run a simulator on your Mac later, do not despair). Finally, the Target minimum iOS Version should be 8.0, because there are not so many devices with lower versions, but it’s up to you if you wanna change that version (keep in mind that if you choose a lower version, you could see different errors in the build).
- 5.- Logging: this is very descriptive, you can choose what to send to the logs in your production builds, it could come in handy when you’re debugging something, just keep that in mind. It’s recommended that if you already tested the game and it’s good to go, you could check everything to None (except Errors perhaps).
- ALL THE OTHER SETTINGS ARE RECOMMENDED TO BE LIKE THE IMAGES. SOMETHING COULD GO WRONG OTHERWISE. But, of course, if you know that changing some settings will improve your game in something, please do so. But if you don’t know what those settings do, keep them like the images.
Building in Unity
Ads mediation
Just before building, something to consider about the ads: you are free to use the ad mediation that suits better for your project needs, however, IronSource has been proved and tested in several iOS games and is the one that works better. If your game has another mediation, you should consider changing to IronSource (if you don’t want to mess with a new mediation). To do so, you could follow the steps in this process about how to create new placements: Iron Source update. Of course, it’s not that easy, you should delete the unnecessary files of the old mediation; if you were using cascades, you can follow this document in order to know what to delete (this could vary depending on the version of cascades you are using): Removing AdNetwork SDK. After removing the old mediation, you can import the full ad package that you will use (IronSource is recommended).
Double check anchoring and positioning
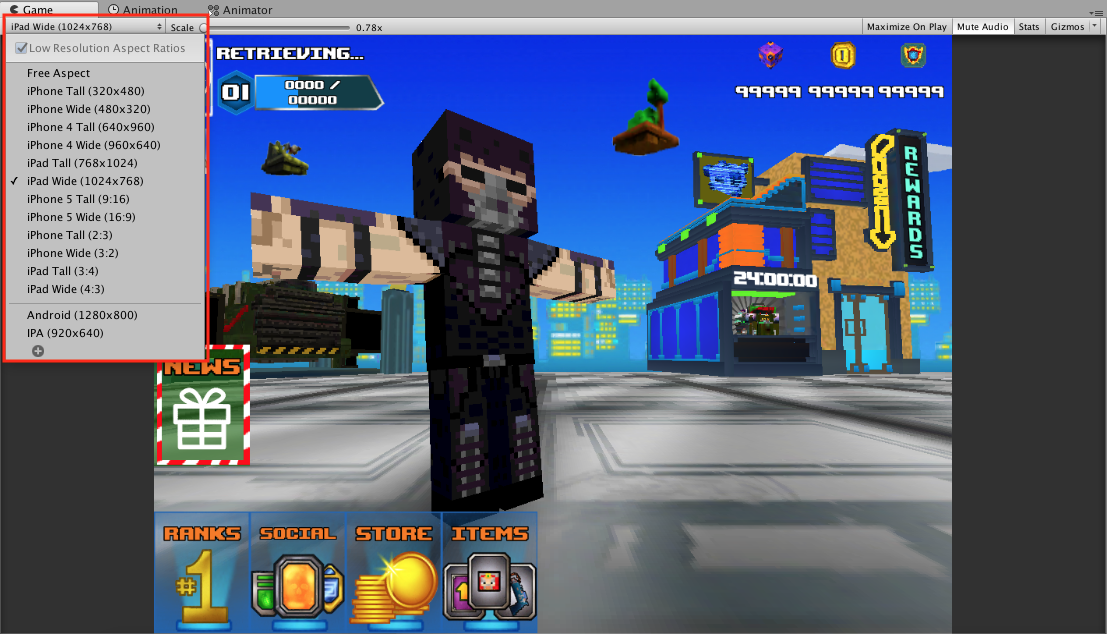
When you have the iOS platform selected in Unity, you will be able to choose between different resolutions for your Game screen. I encourage you to double check your game with different resolutions and see how the UI looks; you might need to fix some anchors in your game. There is no proper tutorial for that, you will need to do it by hand or ask for help to your UI artist of trust.
Create new build
If your game looks good and everything seems to be ok, you are ready tu build it. Do it like you normally build your Android games, go to Build Settings > Build. If everything is correct without errors, you’ll see something like this in your Finder:
Sometimes, depending on the version of Unity you have, the Xcode build might need to open a Terminal to compile some files with cocoapods, which should be already installed with your Xcode version 10 or higher and the process is automatically managed, so do not worry about it.
Xcode build and upload
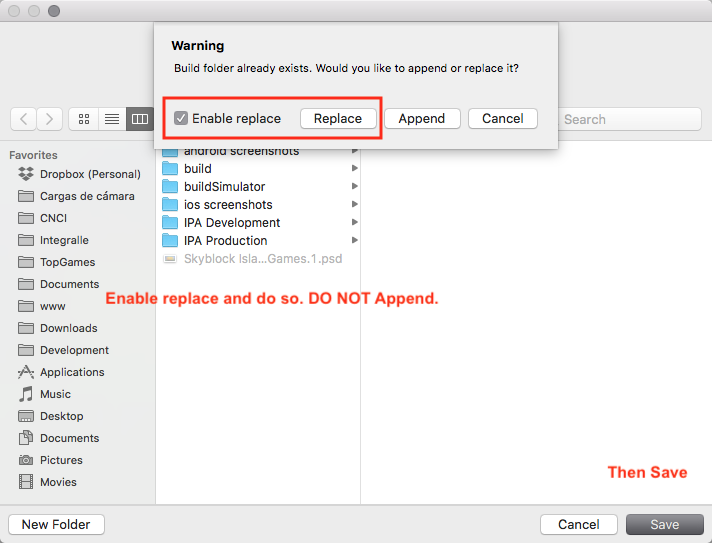
One thing to know is that if you are going to build a new version of your app, but you already have one created, you need to Replace the content, DO NOT APPEND IT.
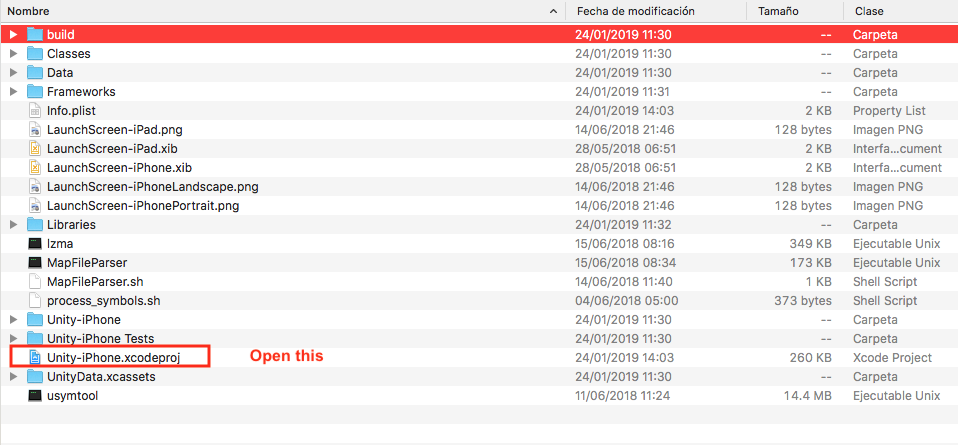
Once your build is done, open the Unity-iPhone.xcodeproj. Your Xcode will open and after some internal processing and compilations, you will see something like this:
There a few thing to notice here:
- Project: This is where you need to click to open the current app settings and configurations.
- General: This is the main tab where you’ll change some of the more important settings. Make sure you enter here before doing anything else.
- Current project: Under this section you’ll only need to change a few settings showed here. You should only see two tabs inside this section:
-
- Info: everything should be left with their default values.
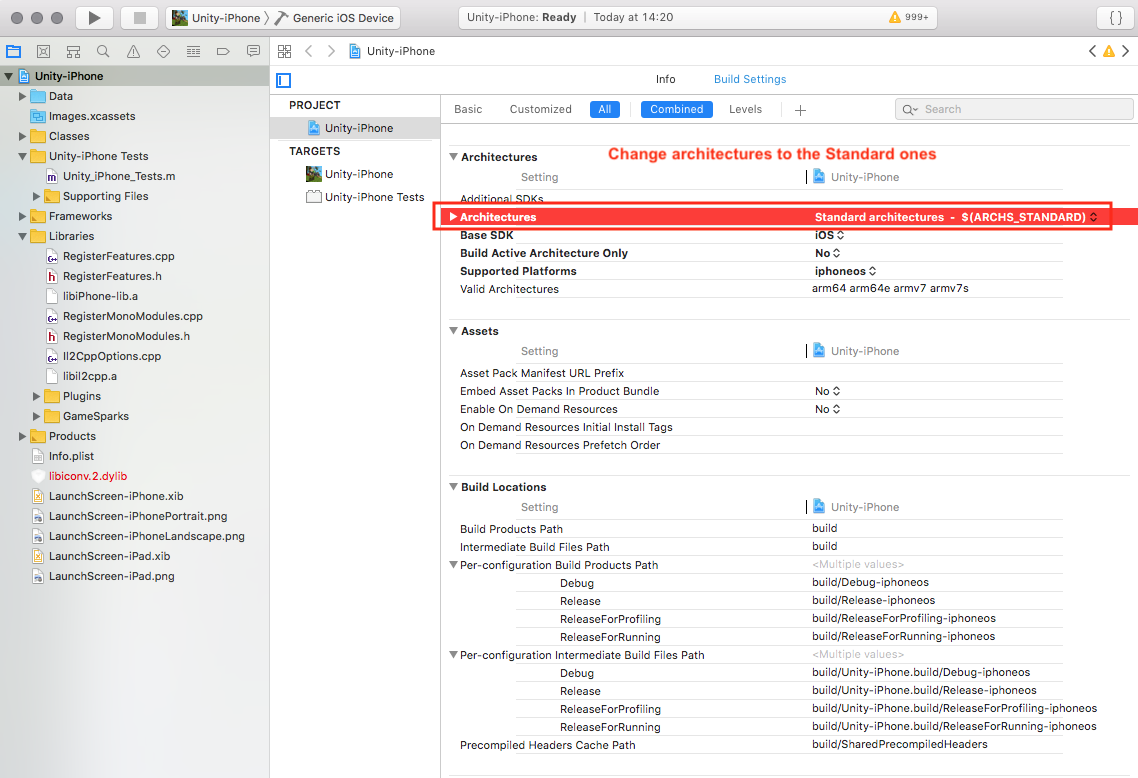
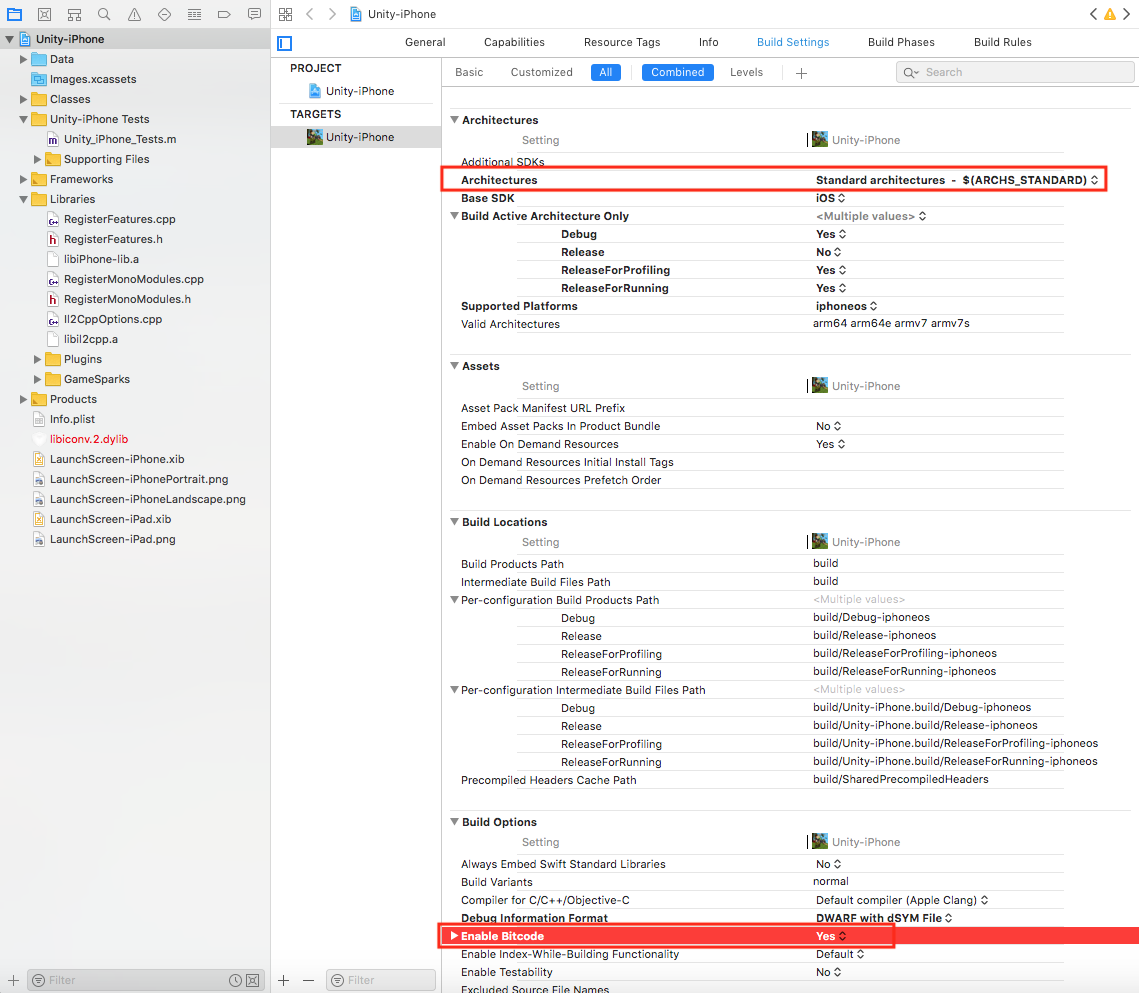
- Build Settings: make sure you choose the Standard Architectures under the Architectures section. Everything else should be left as default.
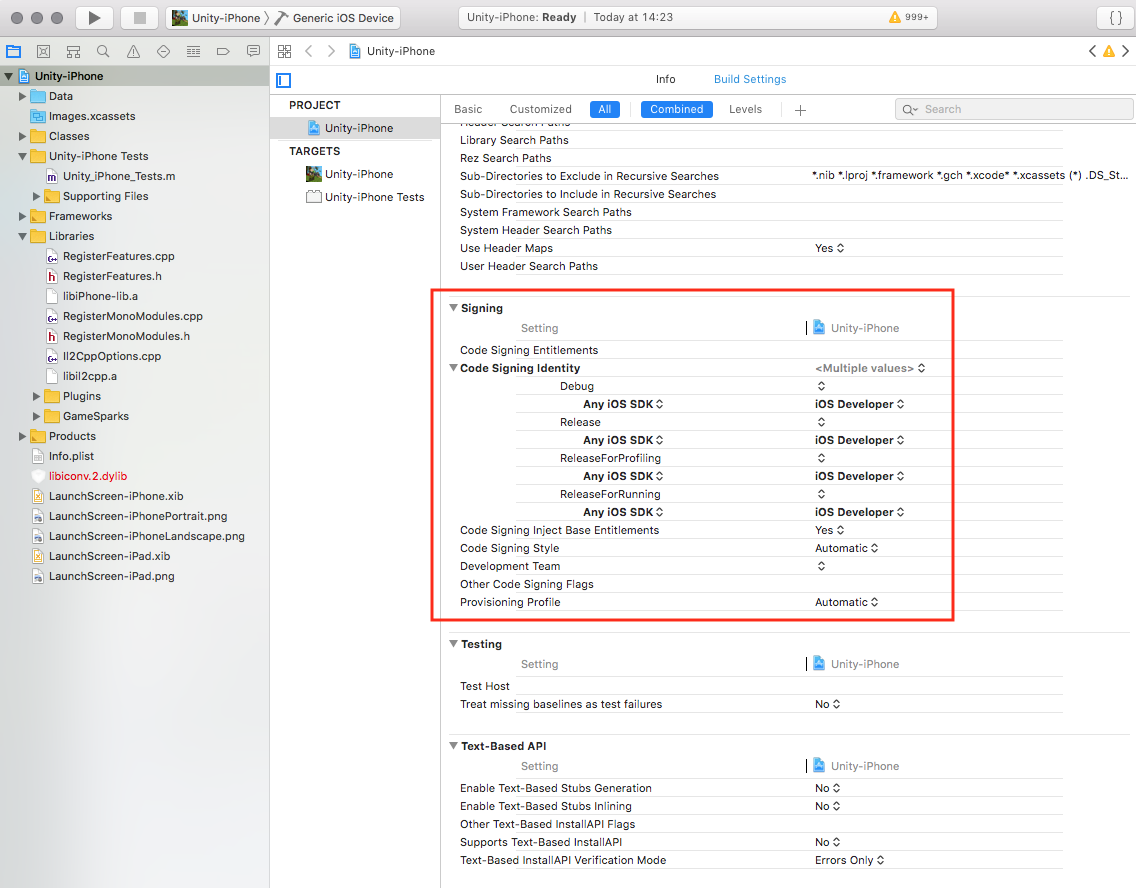
The next thing to check under the same tab is the Signing section, make sure everything is like this:
- Info: everything should be left with their default values.
- Current target: In here you will need to check the main settings and configurations. But first, let’s finish some more stuff.
- Test Build: We’ll use TestFlight for testing and/or sending IPA files to members of the team, so this Test target won’t be needed, you’re free to leave it or remove it. You can right-click on it and Delete it with out any concern.
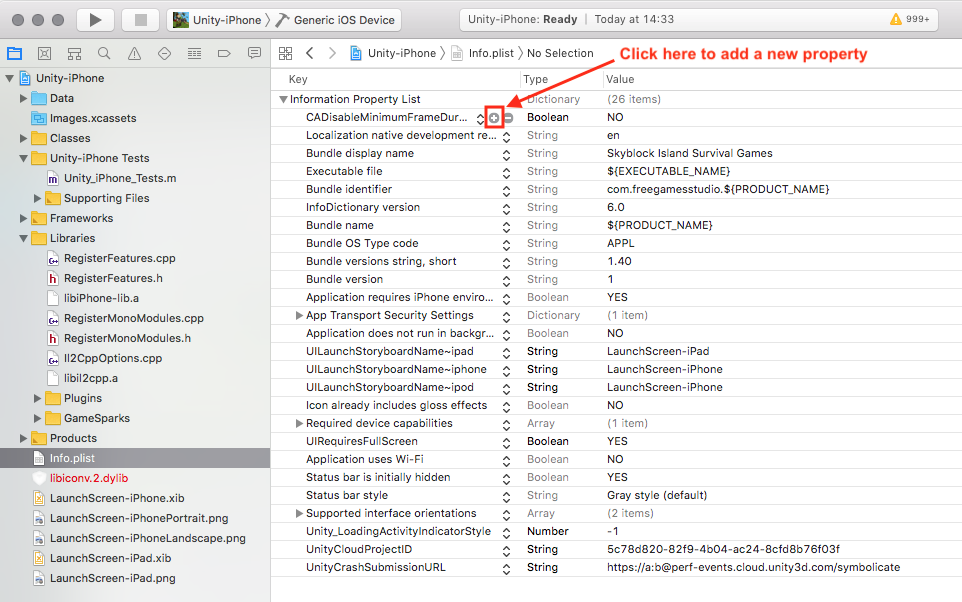
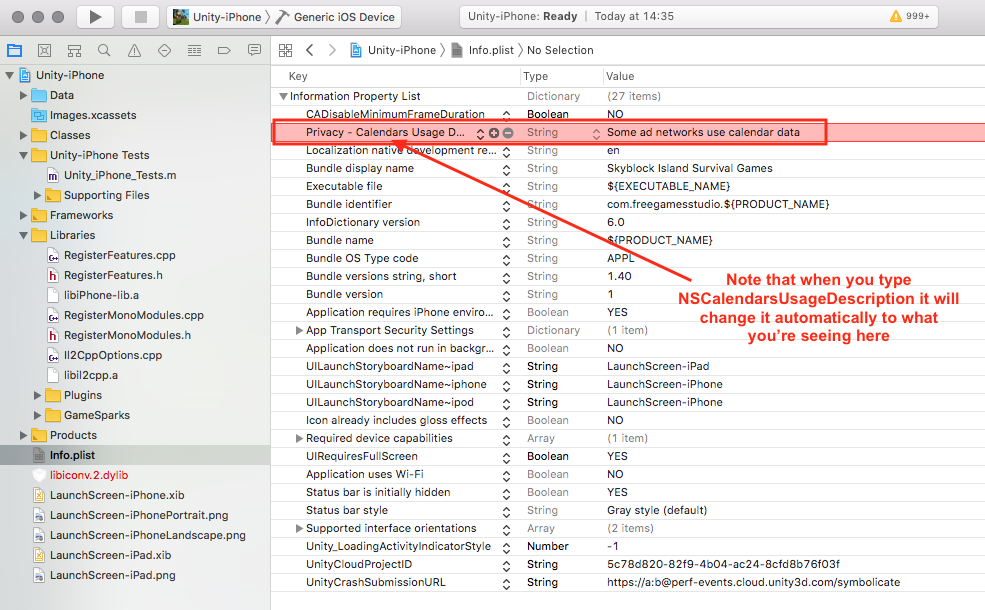
- Info.plist: This one is really important, it informs to Apple what’s inside the app, which should include specific data about some third parties, such as the ads, so you need to add a new Property with a Key called “NSCalendarsUsageDescription” with the Description “Some ad networks use calendar data“, or any other you want.
- Game identification: Ok, now that we have the first steps covered, we can start checking out the main settings. Under this section you’ll need to make sure that the info provided here should be the same than the info in Unity, as we saw in the Unity configurations.
- App signing: The first thing you need to do here is check the Automatically manage signing checkbox. You’ll need to configure Xcode with the same account you registered with the App Store Connect. If everything is done correctly you should be able to choose Aeria Canada Studio under the Team select input. If something is wrong with the Provisioning File or you need to create a new one, check these steps before:
-
- Access to the Certificates, Identifiers & Profiles page (click here) and make sure you are in the correct company. After that click in Identifiers > App ID on the menu on your left. Here is where you can create a new app specifications.
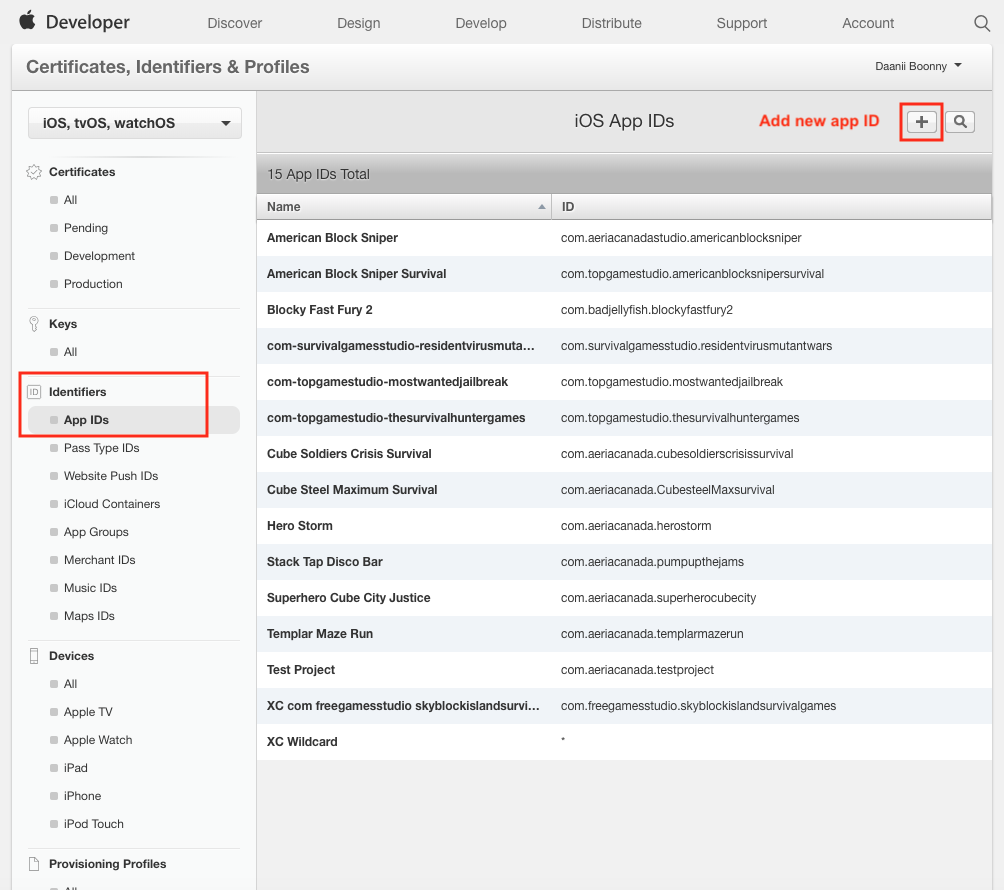
The App Name should be exactly the same as the one you are planing to be in the Store. For the App ID Sufix you should select Explicit App ID and write the one that works as a Bundle Identifier in Unity. The App Services should be left as default, unless you are using something extra. Save after everything is filled correctly. - After everything is created (or you are just editing an existing app) you should be able to fill everything in the Signing section in your Xcode project.
- Access to the Certificates, Identifiers & Profiles page (click here) and make sure you are in the correct company. After that click in Identifiers > App ID on the menu on your left. Here is where you can create a new app specifications.
- Deployment version: This is where you’ll choose the iOS versions you’ll include for your build. It’s recommended to choose 8.0 or higher. Also make sure you choose Universal under the Devices select.
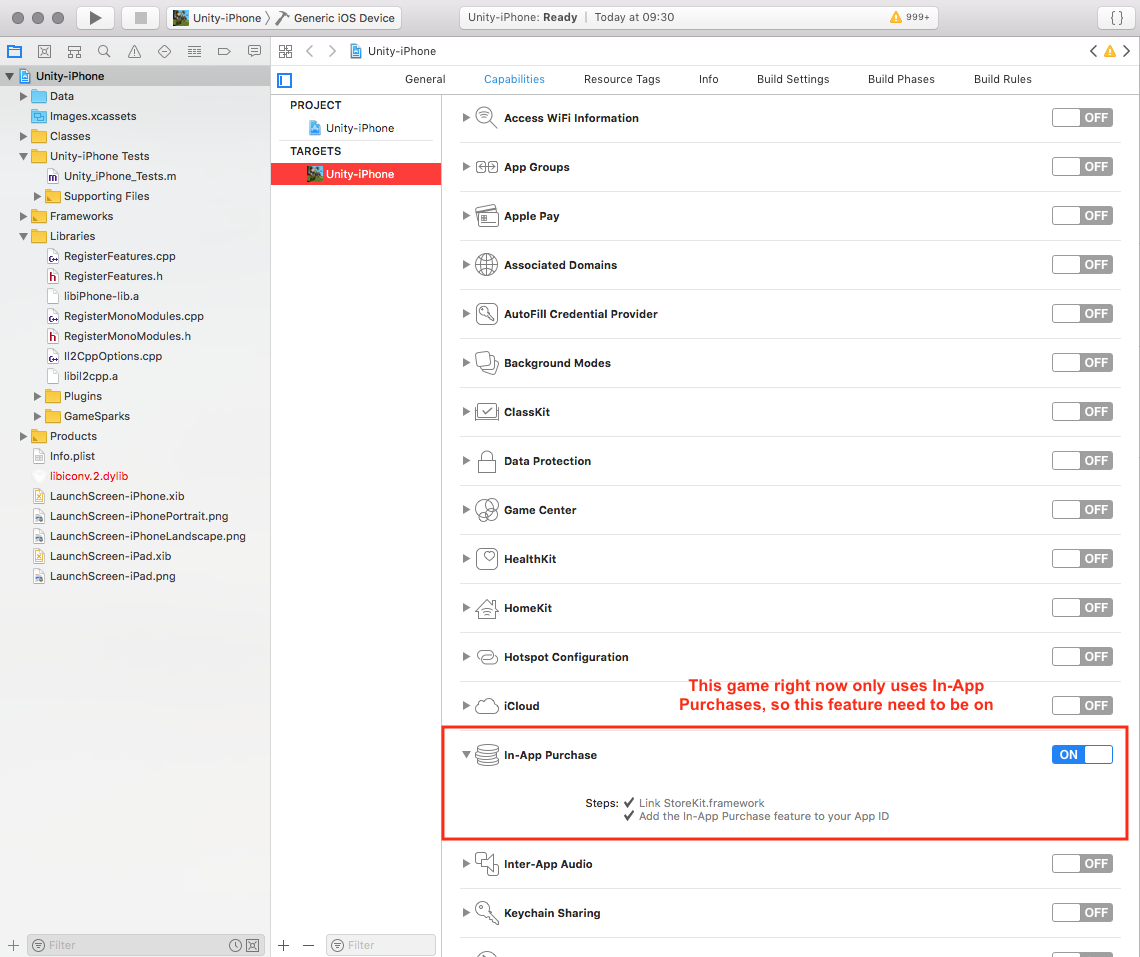
- Capabilities: This is where you’ll choose some other features that your game will have. Just turn on the options you’ll use, e.g. In-App Purchases or Game Center if your app has leaderboards and/or achievements.
- Build Settings: Here is just a double check of something you should already have. As we saw before, you should make sure Standard Architectures are selected. Also in the Build Options, make sure Enable Bitcode is enabled.
Apple Store configuration
Once everything in your Xcode project is done and you have a working app (and you have tested it already), then you are ready to create the placements and all the requirements in App Store. First go to App Store Connect and make sure you are logged in with the correct company. Then go to My Apps.
Create app store placement
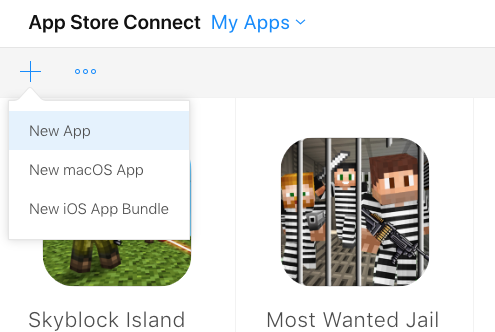
DO THIS ONLY IF YOU ARE CREATING A NEW APP.
Click on the + icon on your top-left. Then choose New App (or new macOS App if you’re doing that).
Fill the required data with the info about your app. Everything should be very intuitive. For the Bundle ID you should choose the one you created in the steps before. The SKU is a unique ID for each app, you could choose any name you want but it’s easier if you choose the same from the Bundle Identifier in Unity. The access should be Full for all users.

After doing that you should see an empty layout for a new app. Under the App Information section you should fill everything according to the game you’re publishing. All the fields should be self explanatory.
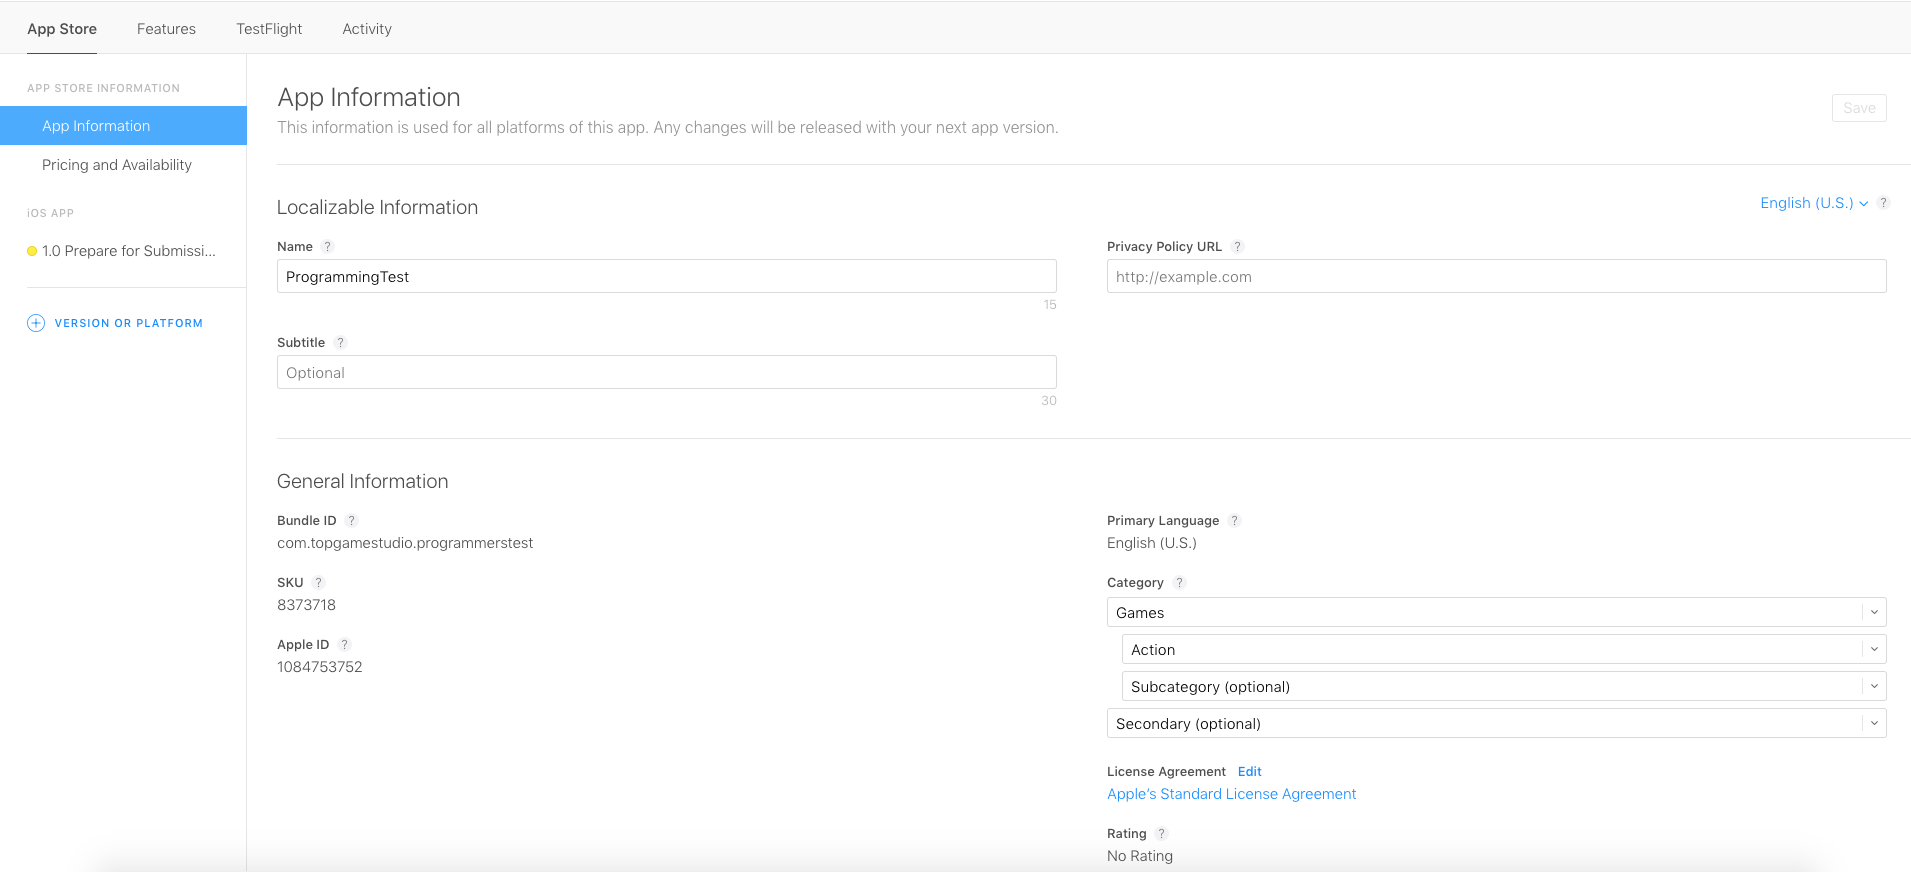
In the next section, Pricing and Availability, you only need to choose the price your app will have (Free is chosen by default as well as the availability in all territories).
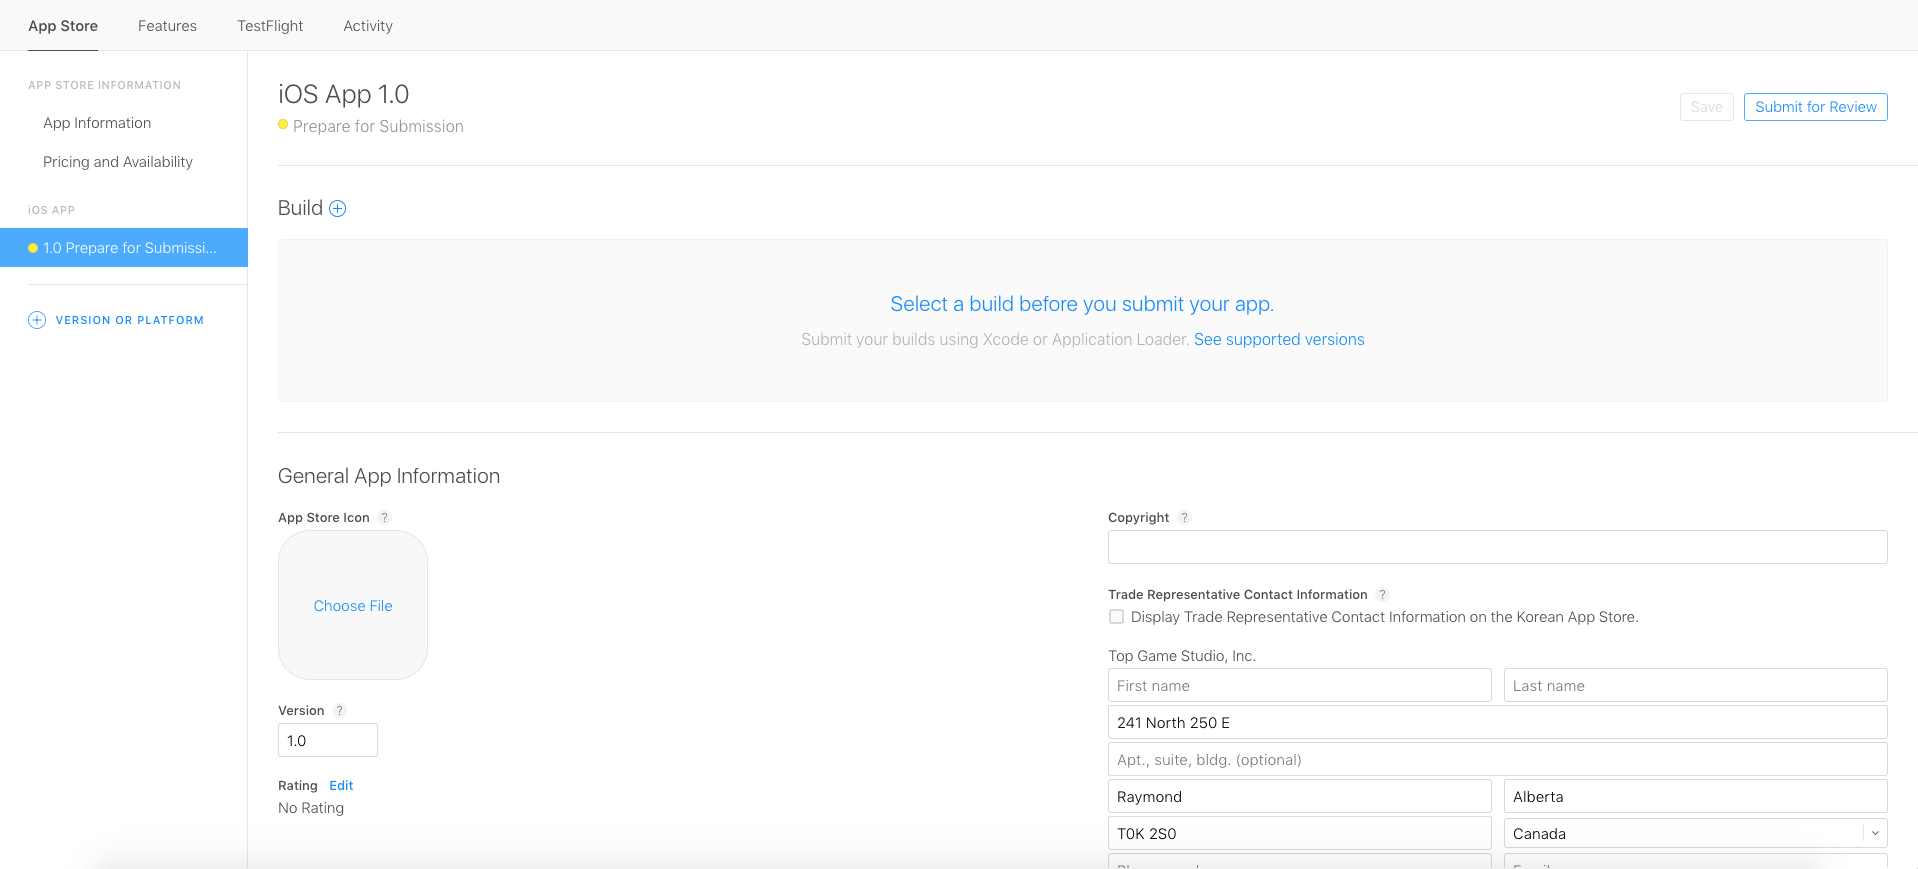
The section below, will have all the info for the App Store Page, which includes screenshots, description, keywords, etc. If you have doubts about some legal info (such as the Copyright and Trade Representative Contact Information), you should copy the same info from another published app.
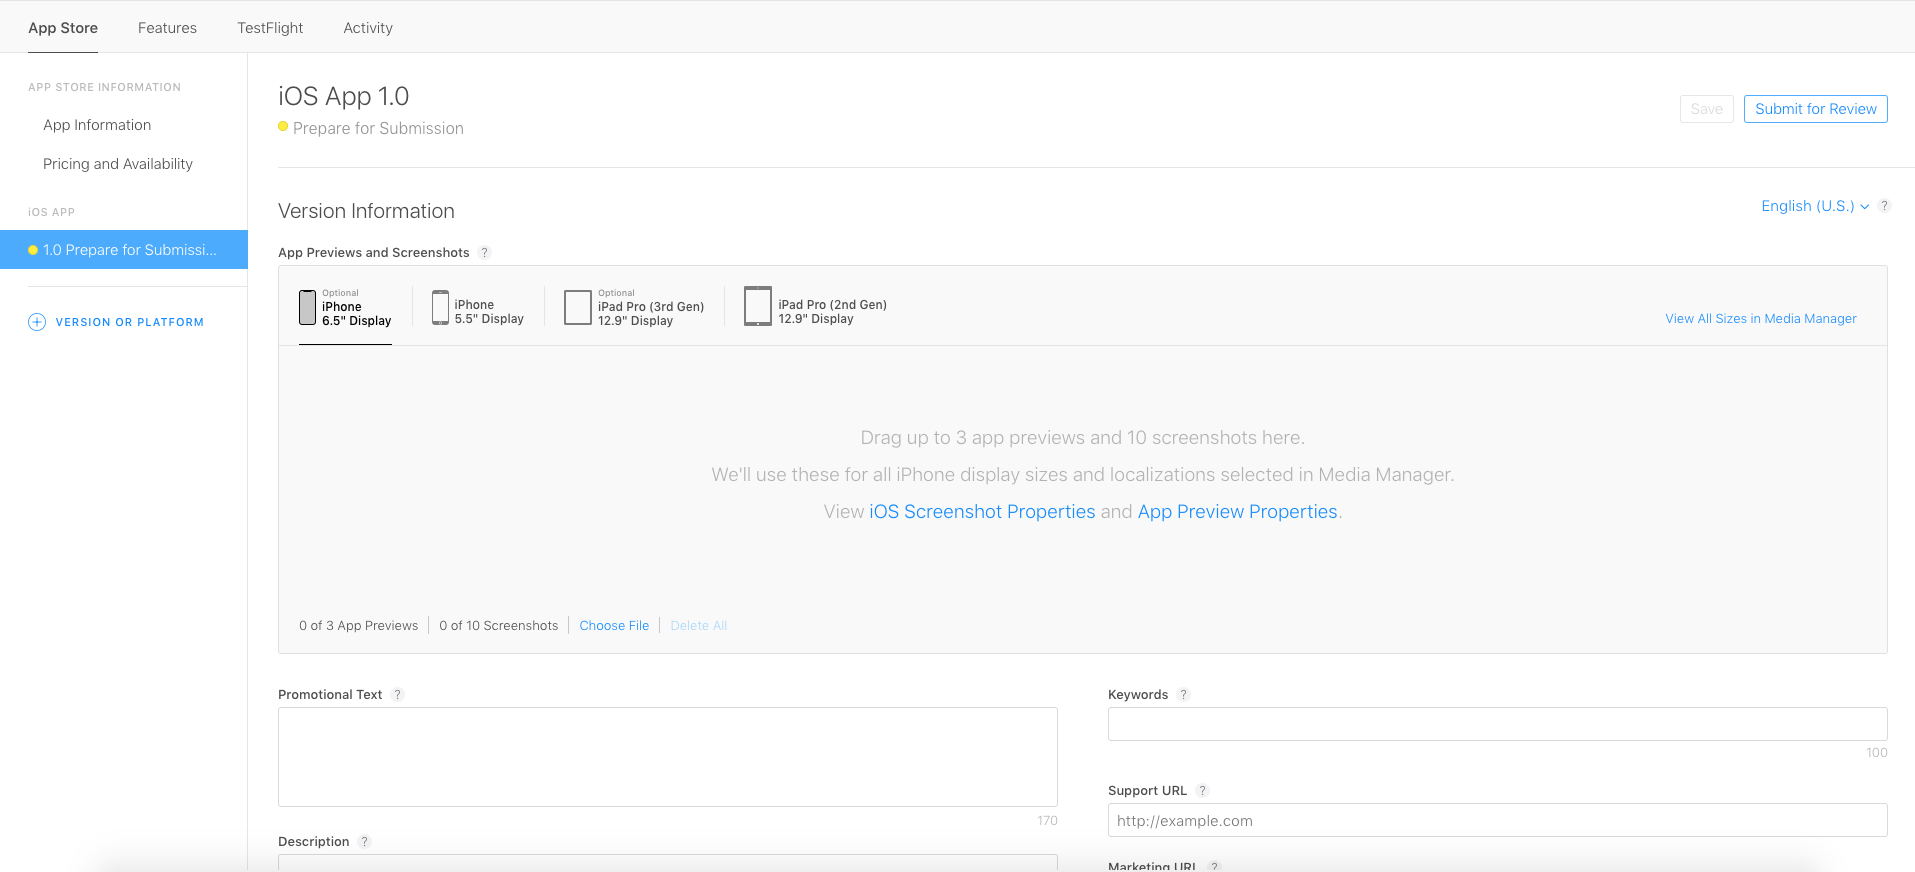
In this page, there is an interesting section, that asks you for a Build, this will be the one you will upload through Xcode. Skip the next step to see how to do this.
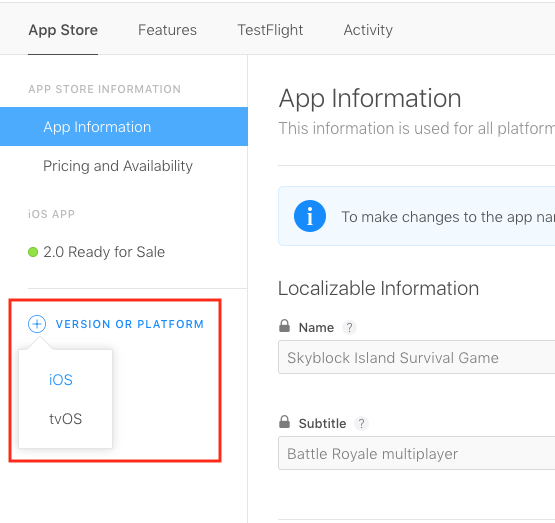
Create an update placement
DO THIS ONLY IF YOU ARE UPDATING AND EXISTING APP.
Click on the app you want to edit and add a new version. This will ask you for a new Version number (remember what I told you about Version numbers and Build number, keep that in mind).
The new placement will have the same info for some fields, you’ll need to worry only for the Build, at least you want to change the description or something else. IMPORTANT: if you want to edit a single field (like a single letter in a keyword [yes, those things happen]), you’ll need to upload a WHOLE. NEW. BUILD. I know, I know, what build? Let’s see in the next step!
Sending app to review
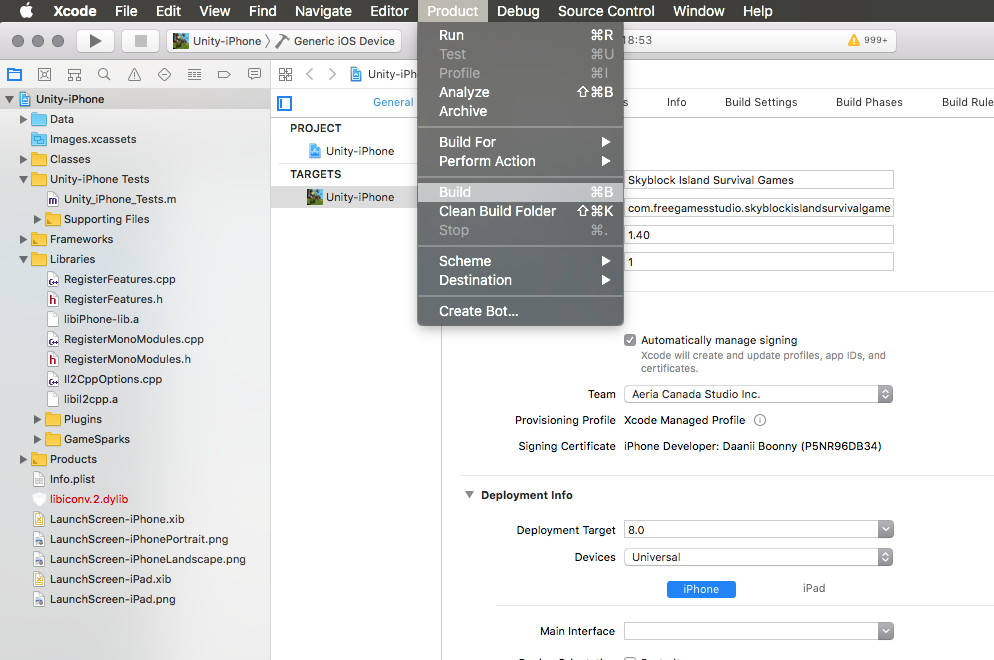
Even if you come from the step regarding publishing a new app or editing an existing one, you will need to do all of this to upload a new build. Remember Xcode? Yeah we were just editing stuff in there a few steps ago. That one. If you think your game is ready, if it runs well in your device and/or your simulator, you can try building it. In Xcode go to Product > Build (Command + B).
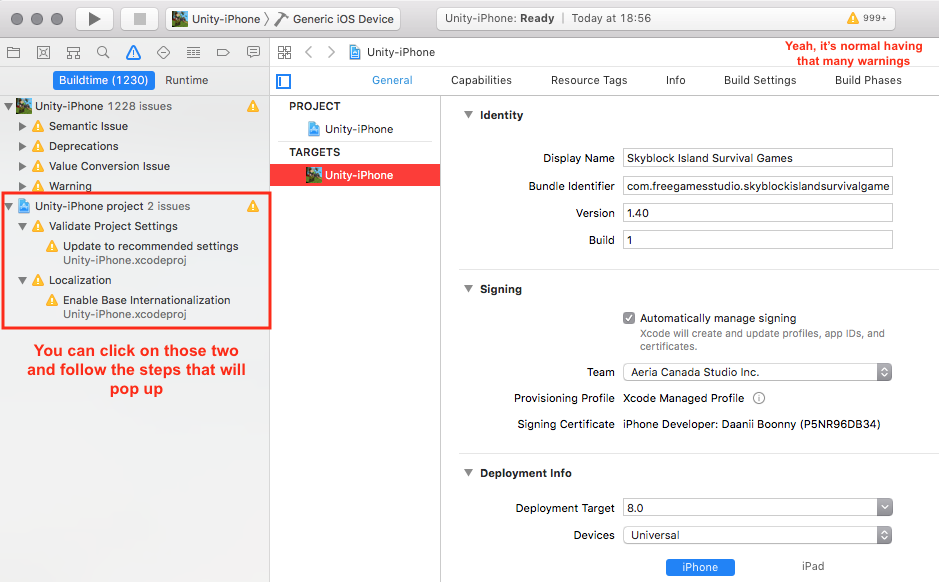
This might take several minutes but if everything is fine you should receive a Successful message. BUT, if you have an error, well, I believe in you, you should be able to fix it, solve it, debug it and so on. This is how it looks when everything is fine:
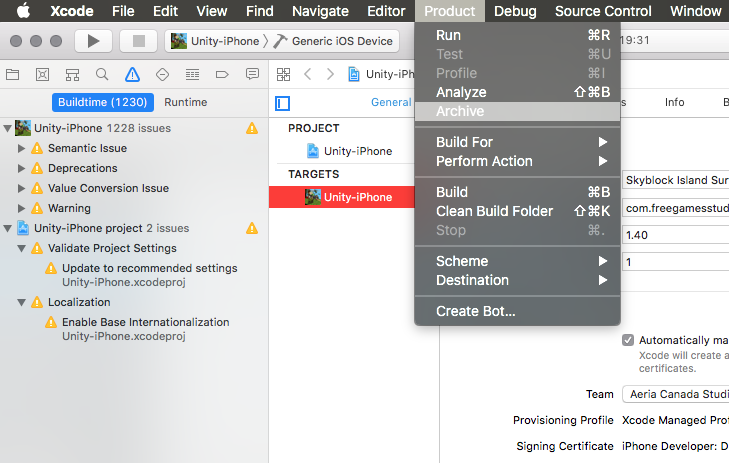
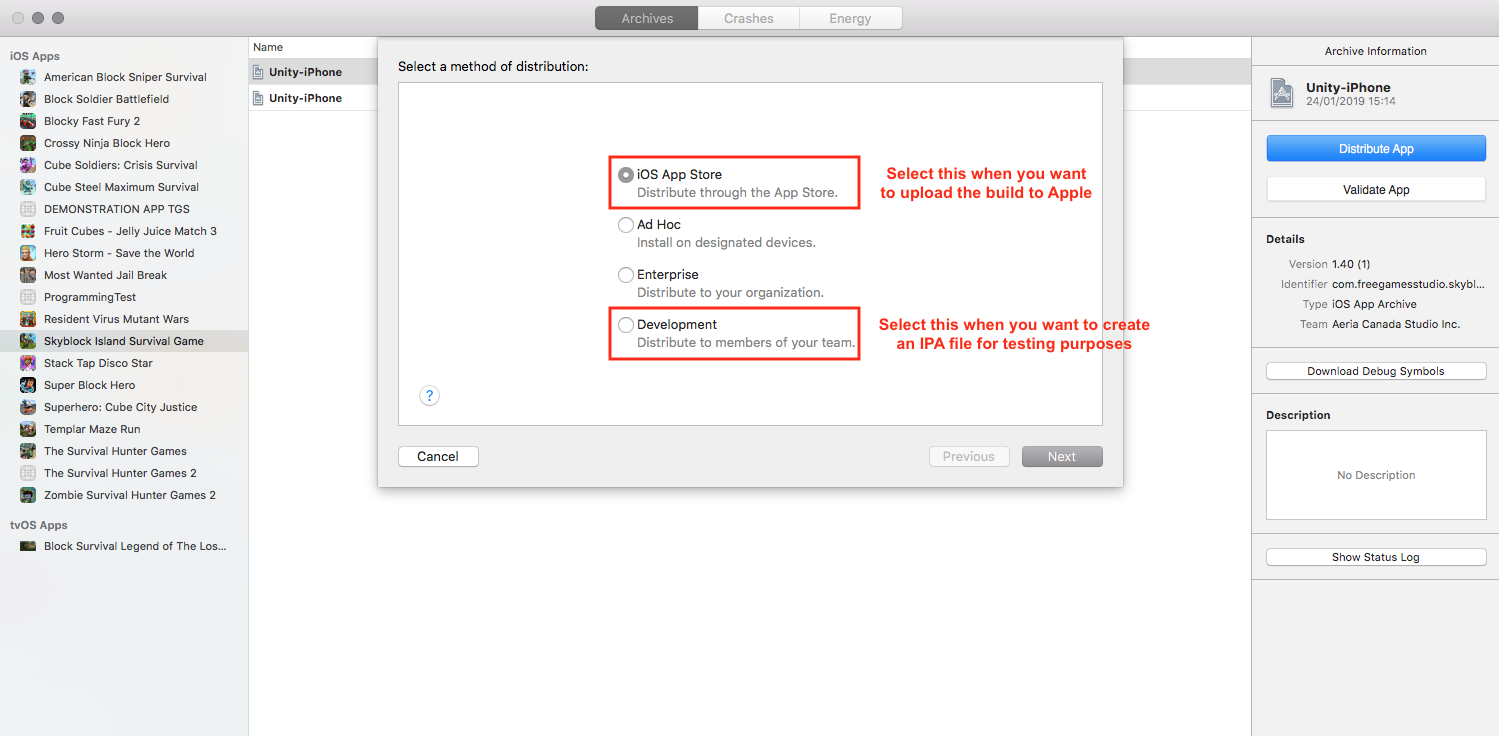
When that is done, you should proceed to Archive. This will make the build available to upload to Apple. Go to Product > Archive.
If everything is done correctly and you don’t see further issues, a new Organizer window should be there (which you can access from Xcode by going to Window > Organizer).
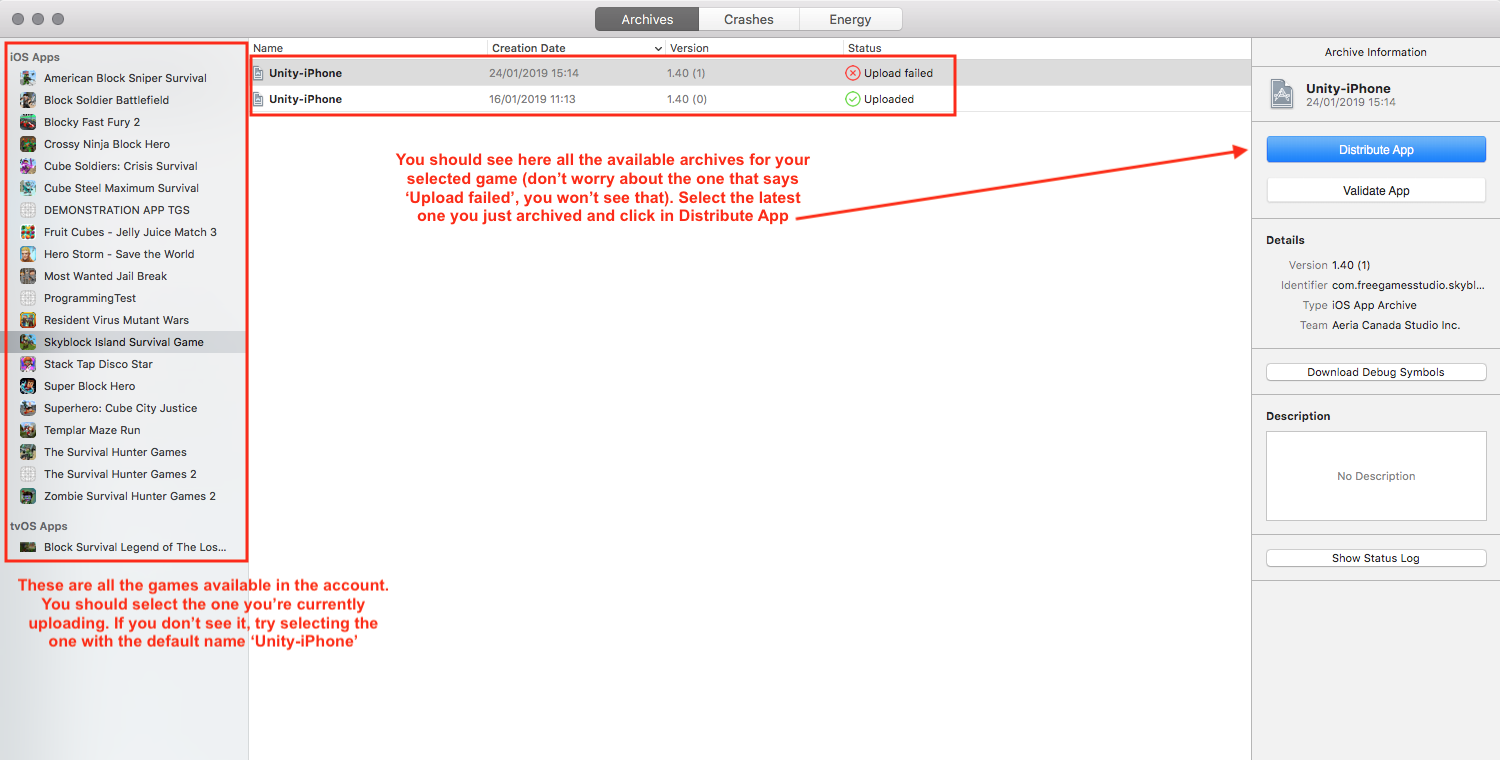
Select which version you want to upload and follow the instructions.
Everything should be really intuitive and all the default settings should be fine. Just click in “Save”, “Continue” or “Upload”, whatever the case is and the game will be fine. After everything is done, you should see a successful message. This whole process could take several minutes. After receiving the OK message and after a few more minutes, you should receive an email from Apple saying that the build has finished processing and that it’s ready to be used in a new build.
Publish app (if Apple wants you to)
When your build has finished processing and you receive the email from Apple, you can go back to where you need a build to select in App Store Connect. Select the one that just finished processing and click in Save (in the top-right corner). If everything else is filled, you’ll see the “Submit for Review” button available. Click on it. It will ask for new info regarding encryption and third party libraries (ads mostly). If you didn’t add something special about encryption, you should deselect that option. If you’re game has ads, then select all the options in the second section. After that you are DONE, yes! Finally!
Or may be not.
You can now send the formal app for review to Apple. This now might take a few or several days. Apple will check your app in detail and they will send you a message if they find something odd or weird or something not right with their policies. Sometimes these messages that they send are quite descriptive, so you can fix it a send a new app (yes, you guessed correctly, you should do a whole new process: build in Unity, build in Xcode, upload, and so on).
After a few attempts (or after the first one, if you are really lucky or really awesome), Apple will give you green light and you can now choose to make your app available For Sale, which means that it will be live. You could choose to release your apps manually (may be on Fridays, ASO* wise) or to be released whenever Apple thinks they are good to go.
This is everything you should know about iOS publishing. If you have some more questions which are not answered is this post, do not hesitate in sending me an email or a Skype or a letter or an owl. Cheers!
* App Store Optimization. This is a whole new subject which I won’t cover in this tutorial but you’re free to research and to do whatever you feel is best for the apps.