Purpose
This article spells out the steps that we take to increase the quality of the products we release.
Applicability
This article is primarily applicable to the development team and to the testers working on that team. It is somewhat applicable to anyone using projects developed by one of our development teams.
Continuous Improvement
Do you see a way we can improve this process? Great. Talk to the team, and we’ll try different things to improve it.
If this tells you to do something you know is wrong, talk to the Scrum Master or team if possible, and we’ll work around it. Don’t blindly follow the steps here, but please don’t ignore them either.
Rationale (“Why?”)
- As craftspeople, we pride ourselves on doing quality work.
- Defects can always be corrected with less hassle the sooner they are found.
- Buggy games make less money; if a game crashes, people play it less (lowering retention and cents per download) and review it poorly (resulting in fewer downloads).
- When we build things ‘right’ it is easier to keep working on and making improvements to. No one wants to work on a project that is a mess.
Who Is Involved?
Everyone on the team is responsible for releasing quality products, not just the testers.
Terminology
An Issue is anything in JIRA — a task, a subtask, a bug, a story.
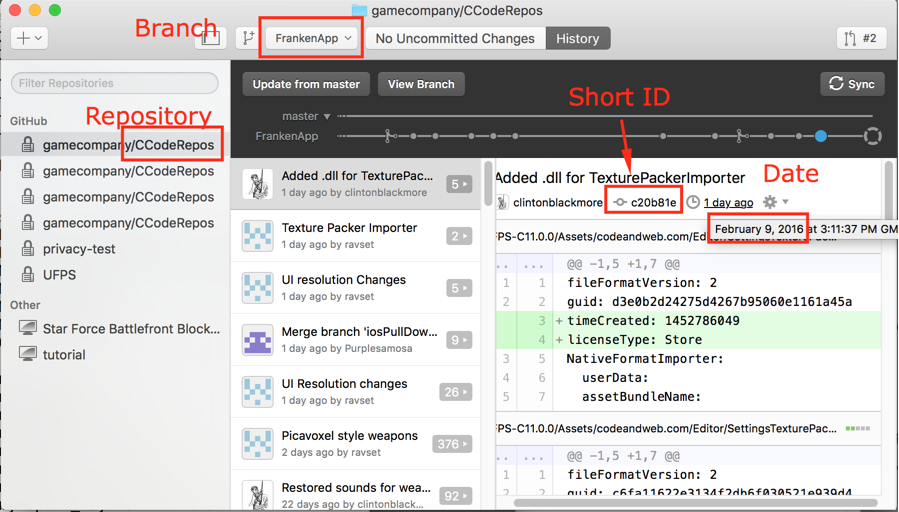
The Mainline Branch is the place where all new development is happening in Git/GitHub. On the CCodeRepos project, this Mainline Branch is called ‘FrankenApp’.
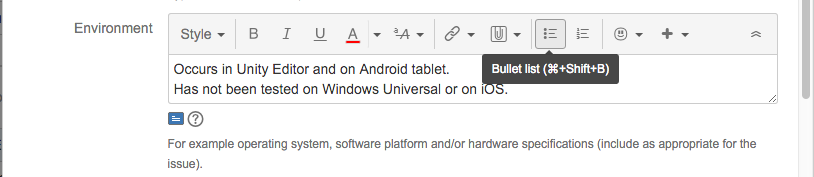
A Platform is a device or environment that runs our project. Most development is done on the Unity Editor platform; other target platforms include Android, Win10 Universal, and iOS.
Black-box testing is testing something without looking at what goes on inside it. If you were black-box testing a calculator, you’d input numbers and symbols and see output results. You have no idea how the calculator takes that input and produces the output; you just care that the output is what is expected.
Glass-box testing (also known as ‘white-box testing’) is when you look at what goes on inside a system to see if it is correct. A white-box test of a piece of artwork would check that it is the correct dimensions and has the right import settings. (Maybe it’d even check the colours are ‘right’ or that it evokes the proper feeling.) A white-box test of some code might involve looking over the code or even inputting values in certain places and checking that the outputs in other places are as-expected.
How Bug Reports Are Created
Everyone may find and report bugs.
If you sync up to the mainline branch and the build is broken, alert the entire team and ask them not to sync up. We’ll get people in right away to fix the problem.
For lesser bugs, either tell a tester what you saw and what sort of things you think will cause the bug to occur, so they can probe it more deeply and write up a bug report, or, write up a report yourself.
If you are reporting a bug, you need to do the following:
- figure out the simplest set of steps to reproduce the bug
- if possible, test on multiple platforms (Editor, Android, iOS, etc) and note where the issue occurs
- Create a a new issue in JIRA and fill it with all the good stuff that goes into a bug report
- If the new issue is related to the current sprint goal:
- add it to the current sprint
- mark it as blocking one or more issues in the current sprint
- move the ‘blocked’ issues back to “In Progress”
- If it isn’t related to the current sprint goal,
- add it to the product backlog [that’s where it’ll go by default]
- let the Product Owner know so s/he may prioritize it and bring it into a future sprint
Testing Procedures
Note that this will change if/when we get automated building and reporting going.
Testers sync up to the mainline branch regularly (ideally, after every commit), and build it for different platforms. If the build is broken, they alert the entire team, and it becomes a priority to fix.
Testers will sync up to other branches on request.
Testing will go through multiple stages. [It might be nice to write down somewhere what sort of testing has happened to a given build so we can have confidence in how well it works.]
- Does it build?
- if it doesn’t build, alert everyone who uses the branch.
- if it is the mainline branch, alert the entire team, and ask them not to sync; fixing this issue is a priority.
- if it doesn’t build, alert everyone who uses the branch.
- Do a smoke test
- a smoke test is a simple test where you run the game on the device, and check to see if you can get into the different scenes without crashing. A sample smoke testing procedure is to:
- does the game go into the menu scene?
- does the game go into the gameplay scene?
- can I move around and shoot?
- That’s it. If the build fails the smoke test, alert the team (if it is from the mainline branch) and don’t test it any further.
- a smoke test is a simple test where you run the game on the device, and check to see if you can get into the different scenes without crashing. A sample smoke testing procedure is to:
- An In-Depth Checklist
- Testers will develop (and change, over time) a checklist of things that need to be tested for their game.
- Here is a sample checklist, for the CCodeRepos family of games:
- Advertising Tests
- does the ‘trailers’ button show an ad?
- does the ‘more games’ button show an ad?
- can I earn a power-up, and does it show an ad?
- if I die in a scene, am I able to watch an ad and continue?
- did I see ads from all of the supported ad networks used by our project in this platform:
- Unity Ads
- Heyzap
- Functionality Tests
- can I beat a ‘kill all the enemies’ mission?
- can I beat a ‘kill all enemies of type’ mission?
- can I beat a ‘get the items’ mission?
- can I beat a ‘rescue the hostage’ or ‘defuse a bomb’ mission?
- can I lose a ‘kill all the enemies’ mission?
- can I lose a ‘kill all enemies of type’ mission?
- can I lose a ‘get the items’ mission?
- can I lose a ‘rescue the hostage’ or ‘defuse a bomb’ mission?
- Miscellaneous tests
- do the enemies follow me around and shoot me?
- can I kill enemies?
- does the game play smoothly, or are their hiccups?
- do I have the weapons I expect to have? Do they carry through levels as designed?
- Advertising Tests
- A Fast Playthrough
- Test different levels; cheat to get there [but be aware that this may cause bugs!]; use your knowledge of the layout and answers to puzzles to get through it really fast. This step is done to prove that parts of the games work when approached as intended.
- Break the game
- You must break the game! Show no mercy to it. Look for edge cases and stress test the system by doing things a normal user would never do.
- This is one of the most important tests to do, as it really does find problems
- The game has problems, and it is your job to find them. (If you don’t believe there are more bugs, you will not find them.)
- Try strange things. For example:
- use unusual button combinations and sequences.
- What if you try to shoot and pause simultaneously?
- things like “shooting, immediately changing weapon, reloading, changing weapon, shooting in the middle of the weapon swap animation, etc”
- can I beat a level without actually killing enemies myself?
- can I get myself or enemies stuck?
- can I rocket jump and leave the expected play area? can I jump onto a building?
- To test a network game, you might try things like this:
- What happens if I take a phone call during gameplay?
- What happens if I switch to another app and back?
- What happens if my wifi signal becomes very poor? [You may be able to cause this with some sort of network simulator, or by putting your device into a microwave and closing the door most of the way].
- Test things related to physics, collisions, AI
- use unusual button combinations and sequences.
- Play through the game like a normal user
- Don’t expect to have the time to play through the entire game, but do try to test all the pieces of it over several builds. (Maybe test level 1 and 5 on one go-round, and 2 and 7 on the next?)
- Aside from starting into the game, don’t use shortcuts or cheat; try to pretend you are someone who doesn’t already know the game
- This is done to prove that the average user will not encounter problems
How Issues Get To Done (Non-Branching Variation)
Note: In the future, we’ll discuss a branching variation with glass-box testing. We decided it wasn’t the highest priority for right now. (If you feel the time has come to make this or other changes, speak up!)
A developer starts to work on a new Issue.
- they move the Issue to ‘in progress’ in JIRA
- they sync up to the mainline branch before beginning work (unless there is a good reason not to, like a broken build)
- If the Issue is a bug, the developer reproduces it before fixing it. This is really important! If you didn’t find it before you fixed it, how do you know that 1) the bug was still there and 2) that your fix worked? If you can’t find the bug, a tester can check to see if it still occurs.
- generally, they commit frequently to their local branch on their own computer
- potentially, they sync up frequently to the mainline branch
- when the developer feels they’ve completed the work, they sync it up with the mainline branch
- the developer does some basic testing of the functionality on a device
- they move the task to ‘Testing’ in JIRA
- and fill in the name of the build that has the new functionality (or the bug fix)
- and add a comment to the effect of “This appears to be working and is ready for testing.” They might add notes as to how they implemented it, or anything that they think needs to be tested especially hard to make sure it still works.
- ex. “The new elevator platform works by using a kinematic rigid body. Be sure to test that the player can stand on it, and what happens if they are underneath it. It wouldn’t hurt to check how it interacts with enemies and pickups.”
The testing team monitors JIRA. When they see something moved to ‘Testing’, they perform black-box testing:
- one of the testers goes to the Issue in JIRA that is in the testing column
- they note which developer was assigned the issue, and assign it to themselves with a note such as “Started testing work by <implementor’s name>”
- the tester syncs up to a build that contains the implementation
- s/he determines if the work meets the definition of done
- if s/he can’t tell, s/he should talk to the Product Owner, or someone other than the person who implemented it, if possible
- if the work is done, it is moved into the ‘Done’ column in JIRA
- if it isn’t complete, and working:
- a bug is written up and marked as blocking the issue
- the issue is moved back to the “In Progress” column and reassigned to the original developer.
- the developer is notified of the issue
Simplified process:
- sometimes this is more work than is necessary. Depending on the availability of the developer, the tester might just point out what is wrong, the developer might fix it, and it can be tested again.
Additional Things
Re-Testing Old Bugs
Every now and then, testers should try to reproduce old bugs, both ones marked fixed and ones that are believed to still be bugs, and make sure they haven’t reoccurred, or haven’t been fixed. It would be helpful to mark what build it was tested on in the comments (and the build name should go into the ‘Affect build(s)’ field if it is now a bug).
If an old bug that was fixed is now a problem again, it should be brought back to the sprint backlog or the project backlog (depending on whether it was due to a change done in this sprint or not.) If the new problem is similar, but not the same, it should simply be written up again.
Collateral Fixes
In the same way that ‘collateral damage’ is damaging things that you didn’t mean to, it is possible for things to be fixed that weren’t meant to be. Let’s bring these issues into the current sprint, put them in the ‘Done’ column, and edit the title to start with “[Collateral Fix]”. (If it doesn’t stay fixed throughout the sprint, and wasn’t part of the sprint goal, the name can be edited again and it can be moved back to the backlog.)
Other Ways To Close Bugs
Sometimes a bug is written up, and the behaviour is what is intended. This should be closed (moved to done) with a comment mentioning that it is as-designed.
Occasionally there is a bug that we will not fix. If the team agrees, it should be closed (moved to done) with a comment saying that we will not fix it.