
For X code games
You need to do the following first before importing the data from the exporter.
For new weapon prefabs
Bring over the pickups
*Old PF*
- Look for the Weapons and Ammo pickups you need to bring over, this includes the weapons that were replaced. (If there’s a new bow, you also need to bring over the multi_arrow pickup)
- Right click on the weapon/ammo pickups (Under _AAPrefabs) and “Select Dependencies”
- Right click and “Export”
- Uncheck “Include Dependencies”
- Uncheck ALL the scripts
- Export
*New PF*
- Import
- Test, Save, Commit and Sync
Import the Weapon assets
*Old PF*
- Create a prefab out of the new weapons inside the !!!FPS Weapons. (Drag and drop from Hierarchy to your assets folder)
- Right click on the new weapon prefabs and “Select Dependencies”
- Right click and “Export”
- Uncheck “Include Dependencies”
- Uncheck ALL the scripts
- Export
Update the FPSPlayer (Part 1)
*New PF*
- Import the new weapons package
- Drag and drop all the new weapon prefabs inside the C16 !!!FPS Weapons
- Check if they’re placed properly. Enable them in the inspector tab and try to compare them with the other weapons.
- Open the WeaponBehavior script.
- Add 2 slashes (//) before the [HideInInspector] on top of the lines with “playerObj”, weaponObj” and “cameraObj”. (See image below. Left before, Right after)
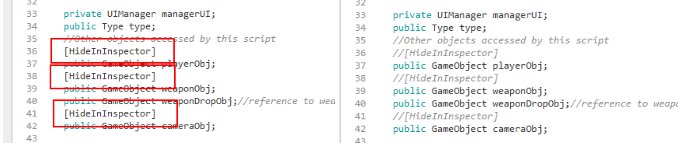
- Save the script
- Inside the New Weapon Prefabs you added, there will be new values in the inspector tab. You need to fill them up properly by dragging and dropping some objects from !!!FPS Player Main Original prefab.
Player Obj = !!!FPSPlayer (inside your !!!FPS Player Main Original prefab)
Weapon Obj = !!!FPS Weapons (inside your !!!FPS Player Main Original prefab)
Weapon Drop Obj = Your weapon pickup (Look for it in _AAPrefabs, most likely, it’s already filled up)
Camera Obj = !!!FPS Camera (inside your !!!FPS Player Main Original prefab)
Ammo Button = ignore this
Weapon Mesh = The first object inside your weapon prefab (usually named “[Weapon]_Anim”)
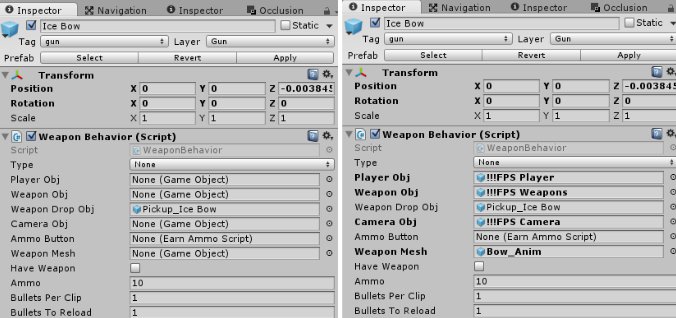
** Tip: Before applying, you can compare the values with the old weapons that are already there
** Tip: You can do this on multiple Weapon Prefab at the same time by selecting all of them before dragging the objects into the inspector tab. The only ones different will be Weapon Drop Obj and Weapon Mesh.
- Test, Save, Commit and Sync
Update the FPSPlayer (Part 2)
*Still under New PF*
- Uncheck the all the weapons again in the inspector tab (make them hidden)
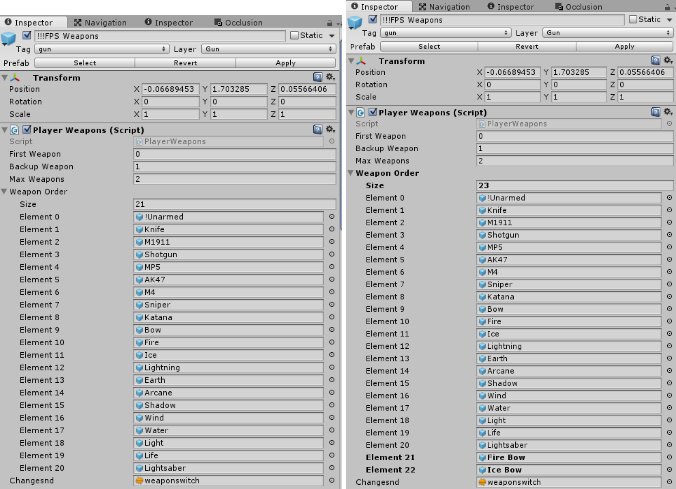
- One the !!!FPS Weapons > Player Weapons (Script), go to Weapon Order. We currently have 21 weapons listed. Change the “Size” in accordance to how many new weapons are added and press enter. (Example below, I added 2 weapons)
- Drag and drop the new weapon prefabs (from inside the !!!FPS Weapons) to the new Elements added.
- Remove the “//” you applied in the WeaponBehavior script and save
- Apply the changes to the !!!FPS Player Main Original prefab
** Note: Some X- code games REPLACE weapons, instead of ADDING new ones. Follow the same process but instead of adding– replace the old weapon prefab by replacing it inside the “Weapon Order”.
** Tip: Always compare the weapon order from the !!!FPS Player Main Original prefab of the old PF to the one in C16 to avoid conflicts.
- Test, Save, Commit and Sync
Weapon test
- Compare the weapon number from !!!FPS Weapons to the pickups inside the _AAPrefab folder
- Lay down all the new weapon pickups and ammo in front of the player on level 1
- Play the game from the Menu l weapons are working.
- Check the projectile, special effects and audio. Make sure it’s similar to the oldScene and check if all weapons are working.
- Check the projectile, special effects and audio. Make sure it’s similar to the old PF
- AFTER TESTING, remove all the new weapons on level 1 and save, commit changes, and sync.
Import the weapon reward icon
*Old PF*
- On the Menu scene, play until the Mission Select window to see which weapon rewards were replaced
- Under Assets > _Textures > NewUI > textures into screen > permanent weapon icons , you need to export the new reward icon sprites there
*New PF*
- Import the new sprite images
- On the menu scene, go to your UI object. UI > select_difficulty > level_select_info_panel > level_reward_image and look for the Weapon Image Swap component
- Place the new sprites accordingly. You can use the old PF as a guide on what to place where
![]()
** Note: Make sure to double check the ORDER of the weapon objects under the !!!FPS Weapons. It should be identical to the !!!FPS Weapons of the Old PF so the weapon rewards order for levels 1-6 would be the same**
For the new enemy prefabs
Export the Enemy assets
*Old PF*
- Remove the other components and only leave “Transform” in the inspector tab
- Right click on all the new Enemy prefabs (Under the _AAPrefabs folder) and “Export”. These enemies should only have the “Transform” components in the inspector.
- Include the prefabs
- Export
Update the Enemy prefabs
*New PF*
- Line up the enemies in a scene with a BlockNPC-Melee prefab
- Copy ALL the components from the BlockNPC-Melee prefab into all the enemies (Except Transform). You can select all of the new prefabs first and then click “Paste component as new”.
- Adjust the “Box Collider” until it covers the enemy’s body
- Find the components “Enemy Weapon(script)” and “Enemy(script)” on the inspector tab, click “Find Dependencies” on both scripts. Do this on all new enemies individually
- Find the component “Enemy State Machine(script)”. Drag your enemy prefab into the “Enemy” value. Do this on all new enemies individually.
- Apply, Save, Commit and Sync
A: Textures
- Similar to what you did on the blocky enemy skins, you need to look for all the animal textures
- Select all texture and on the inspector tab, do these changes:
- Texture Type: Advance
- Read/Write enabled: ✓ (turn it on)
- Filter mode: Point(no filter)
B: Stat values
- Stat values will be the same with BlockNPC-Melee prefab, so you need to adjust them for all enemies.
- You can either copy the values from the old project folder or follow this spreadsheet.
- TAKE NOTE: on C16 games, we do not adjust HP for new prefabs and stick with the default value. It will only be adjusted according to difficulty balancing.
C: Audio
- Audio is automatically brought over, but you need to check if it’s the same from the old pf.
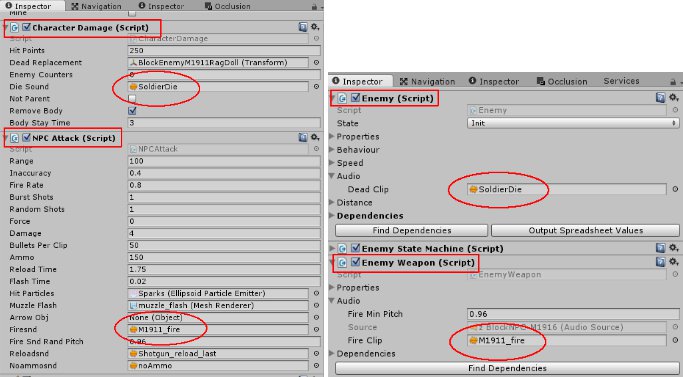
- Attack Audio locations:
Old – NPC Attack(Script) component. “Firesnd”
New – Enemy Weapon (Script) component. Audio > “Fire Clip”
- Death Audio locations:
Old – Character Damage (Script) component. “Die sound”
New – Enemy (Script) component. Audio > “Dead Clip”
- Change the corresponding audio file in the new C16 prefabs
- Do this to all prefabs and apply
D: Animations
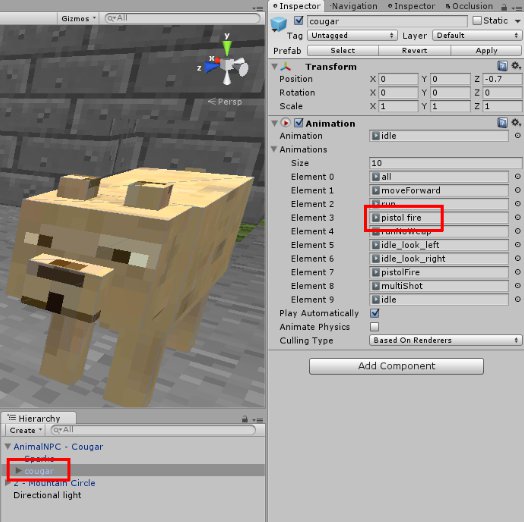
- Open the new enemy prefab and look for Animation component in the 3D model. (see image below)
- Click on “pistol fire” and duplicate it. (see image below)
- Create a folder (anywhere in the PF), name it “[Prefab name]- Animation” (example: Bear-Animation), and move the duplicated “pistol fire” animation there.
- Rename the duplicated “pistol fire” animation to “pistolAim” and use this to replace pistol fire from the prefab animation.
- TAKE NOTE: pistolAim should be named exactly that way to avoid complications and problems on the new prefabs.
- Do this to all prefabs and apply
E: Eyes
- Create an empty object and place it inside the new Enemy Prefab.
- Position it within the Eye area of your NPC (Better if you use a 3D object and just delete the component later — for better positioning)
- Rename it as enemy_[npc name]_eye (e.i: enemy_bear_eye)
- On your new Enemy Prefab. drag the enemy eye to Dependencies> Eye point under the component Enemy(script) in the inspector.
- Double check Apply the changes to ALL the new enemy prefab.
- Test, Save, Commit and Sync
Skyboxes in Mission Select
- Go to “A-Lab Software Skyboxes (18) Vol1” folder and export all of the new skyboxes found
- Look for Map-blank in the Old PF and export it
- Import both packages on the new PF
- Test, Save, Commit and Sync